Building a Kubernetes cluster on Raspberry Pi from ground up
Building a Kubernetes cluster on Raspberry Pi from ground up
Why a Raspberry for the cluster?
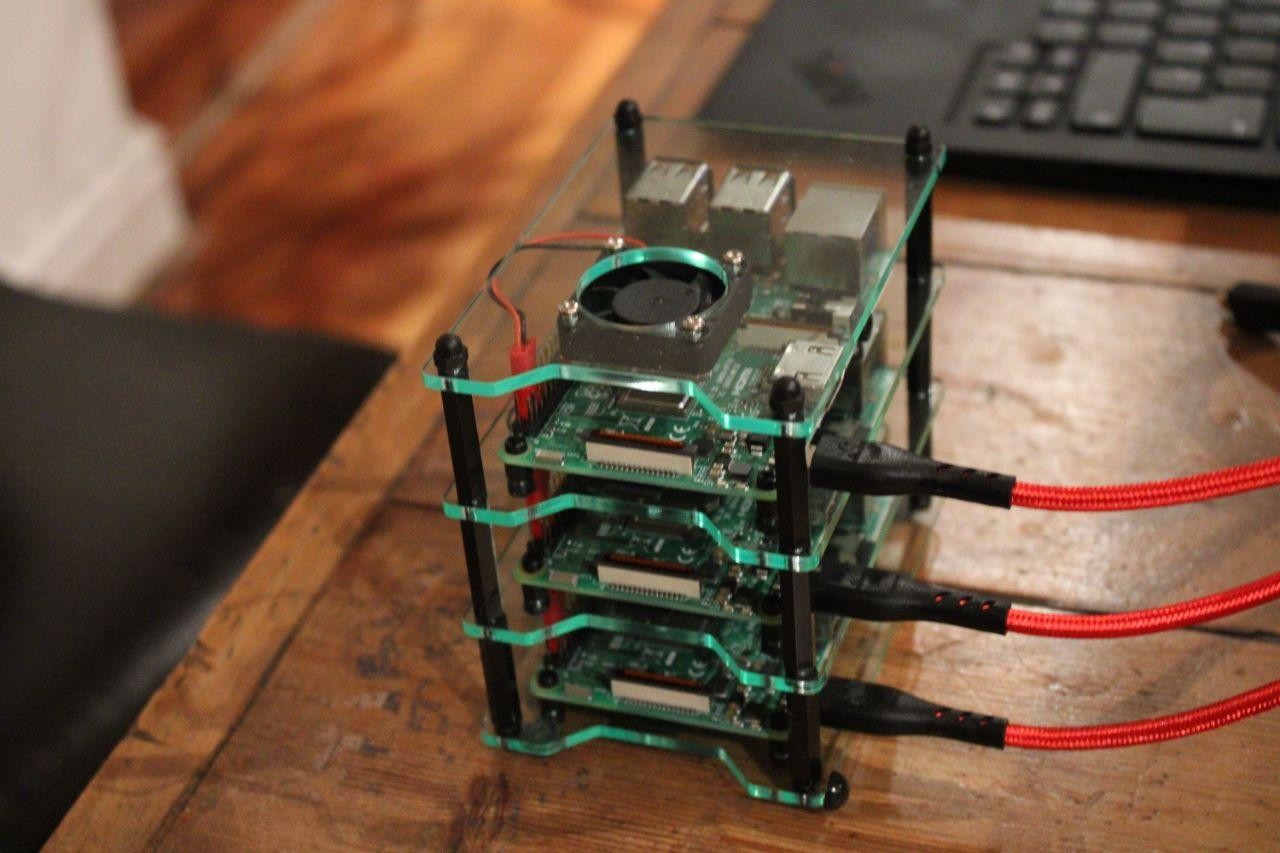
IoT junkies have a plenty of credit-card-sized computers lying around (some reclaimed from archived DIY projects, others just unpacked unused since purchase.) That's just normal! I understand you might have purchased them passionately when you were bitten by the IoT bug, but quickly realized you bought more than you ever needed. We are here to see if you can put them to good computing use.
Enter Kubernetes !
Kubernetes
Production-Grade Container Orchestration - Automated container deployment, scaling, and management
Visit kubernetes.io →Raspberry Pis are such handy single board computers, I'm sure there is much appreciation for them on the internet for being such handy IoT boards, but getting them to run as kubernetes worker nodes is a whole lot fun. - Believe me !
Raspberry Pi
Credit card-sized computers that are affordable, versatile, and perfect for learning, prototyping, and building IoT projects
Visit raspberrypi.com →You might be then tempted to ask if you can use RPi0w for the same. The answer to that is sadly NO. You would need at least 2G RAM to make it a "responsive" worker node. 0Ws are barely 512M RAM.
Next -Off to the local DIY store to get a bunch of LAN cables, 2A 5V adapters, and standoff bolts. If a local electrical chop shop isn't nearby you can always resort to amazon. - yeah!, retails at fat margin, but then believe me - Its money spent well.
- LAN Cables
- Adapters
- If you are using RPi4 / above you would need C type adapters.
- Standoff bolts If you aren't short of budgets & prefer the brass standoff bolts
While I had enough adapters, and standoff bolts - I was short of LAN cables. A local computer accessories shop could provide me that.
Getting the RPi ready
I'm using RPi 3B powered by 5V DC 2A USB power adapter, LAN connected (wired) to my home WiFi router. Yes!, wireless connected RPi also works, but there is always a danger of your kubectl commands "timing out" since the interface is tad bit slower. I haven't tried sub-netting my devices on my home network, but that's some other day, some other blog. Use RPI imager to get your fresh Raspberry pi up and running. Imager is a unfussy tool to get your u-SD card ready in minutes.
Raspberry Pi Imager
Quick and easy way to install Raspberry Pi OS and other operating systems to a microSD card, ready to use with your Raspberry Pi
Download Imager →Whats more:
- You can set the host name
- Can set the WiFi connection settings
- Set a password
- Enable SSH thru a GUI
That saves you a lot of time/effort. I wish they had offered to set static IP configuration as well on the Imager. But nevertheless that is what we set after this. I'm running a headless Debian(Bullseye) on each of my "berries".
$ lsb_realease -a

Distributor ID:	Debian
Description:	Debian GNU/Linux 11 (bullseye)
Release:	11
Codename:	bullseye
Each of my Raspberry runs a 4 core,1G RAM with 16G uSD card. - just about enough to call it a worker node.
Static IP over LAN for all nodes
All your clusters' worker nodes need to have a static IP on the network. - or at least its grossly convenient to have static IP on the network when setting up. Log into your router / or use Nmap
Nmap - Network Mapper
Free and open source utility for network discovery and security auditing - scan your network to discover devices and their IP addresses
Visit nmap.org →to know the IP of your RPi. If for some reason if that's not possible, I hope you have set the hostname for the RPi when burning the image on the uSD card. ssh also allows hostname to be used instead of the IP as well. Please note: If you intend to use hostname for the ssh connection, the host machine should have DNS resolution on the /etc/hosts - you shall see how we do this in the upcoming sections.
$ ssh pi@<hostname or IP>
$ sudo nano /etc/dhcpcd.conf

# append --
interface eth0
static ip_address=192.168.<>.<>/24
static routers=192.168.<>.<>
static domain_name_servers=192.168.<>.<>
Please see above the 2 trailing octets in the IP would be specific to your network.For wireless interface WiFi this is what you can add to the same file
interface wlan0
static ip_address=192.168.<>.<>/24
static routers=192.168.<>.<>
static domain_name_servers=192.168.<>.<
Save, close, reboot - your RPi is now ready to get kubernetes
Installing on RPi
Well for cases where you have Debian installed on the Pi, snap-store comes pre-installed.
Snapcraft - Universal Linux Packages
A package manager that works across major Linux distributions - install, update, and manage applications with automatic updates and rollbacks
Visit snapcraft.io →If not there here is a simple command to get it going.
$ apt-get update
$ apt-get upgrade
$ sudo snap install snap-store
MicroK8s
Low-ops, minimal production Kubernetes for developers, edge, IoT, and appliances - the smallest, fastest, fully-conformant Kubernetes
Visit MicroK8s →You need to do this for each of the RPIs to get the cluster ready
Getting you master plane ready
While its quite easy to add worker RPi nodes, I'd recommend to have the master plane running on a machine / device that has at least 2G RAM. I have tried running a master plane on a RPI3B sadly all the kubectl commands just will timeout.Although one can run worker nodes on RPi, my experience with running master planes (API server) on RPis hasn't been so good. If you have a RPi4 -maybe that'd help
Raspberry Pi 4 Model B
Your tiny, dual-display, desktop computer with up to 8GB RAM, quad-core 64-bit ARM processor - perfect for Kubernetes master planes
View Pi 4 Model B →I, hence picked my minipc to host master plane - Manjaro (Arch) atop 4 cores x86_64 CPU, Intel i7, 16G RAM running Linux kernel 5.15.125
Manjaro Linux
User-friendly Arch-based Linux distribution with rolling releases, exceptional hardware support, and available for Raspberry Pi
Visit manjaro.org →Yes, I know you are already suspecting - If the RPi is linux/arm64 and my master plane is linux/amd64 would this cross architecture cluster work fine?
Your suspicion is not misplaced. We would get to that a bit later once we have setup the initial things. Also note: master planes run only on Linux, while worker plane nodes can be Win/Linux
$ lsb_release -a

LSB Version:	n/a
Distributor ID:	ManjaroLinux
Description:	Manjaro Linux
Release:	23.0.0
Codename:	Uranos
To get microk8s on your Manjaro system you would need snapstore installed. We are to use pacman to install snapstore first, which inturn will get us microk8s.
$ sudo pacman -S snapd
$ sudo reboot now
$ sudo snap install core
$ sudo snap install microk8s --classic
To check to know if microk8s has been installed correctly run the following command
$ microk8s version
MicroK8s v1.27.5 revision 5891
A small change to the already installed version of docker to align it to kubernetes
$ sudo touch /etc/docker/daemon.json
{
    "insecure-registries" : ["localhost:32000"]
}
Append the above json to the daemon file, then run
$ $ sudo systemctl restart docker
$ microk8s inspect
If all the services are up and running as expected, you wouldn't encounter any warnings. - Inspect command is successful.
Editing the known hosts on control plane
The /etc/hosts file in Linux or any other operating system is used to map connections between IP addresses and domain names. Your master plane needs to know this to be able to join the worker nodes onto the plane. All it needs is a quick edit and off you go.
In the earlier days of networking, the /etc/hosts file was used to translate the IP addressed (8.8.8.8) to human-readable form www.google.com and over time it lost its relevance. In modern systems, the whole process of resolving domain names is done through DNS (Domain Name System).
Rarely but still being used in given cases:
- When you want to block certain websites.
- It can be used as a backup in the case when DNS is broken.
- You can also use it as a local DNS server.
Without adding the all worker nodes in the master local DNS (/etc/hosts), the worker nodes would not be able to join the master node. Microk8s join command is a bit brittle but the error messages give a good clue as to what can be done.
Append this to the /etc/hosts file on the master control plane.
<Worker node IP><space><Worker node hostname>
Joining the node
For any node to join the cluster it needs a token (generated by the master) with the IP of the master. Generate the token (from the master control plane) and use the join command from the worker node.
From the master plane:
$ microk8s add-node
From the node you wish to join to this cluster, run the following:
microk8s join <IP>/<token>

Use the '--worker' flag to join a node as a worker not running the control plane, eg:
# use this directly on the worker node prompt
microk8s join <IP>/<token> --worker

If the node you are adding is not reachable through the default interface you can use one of the following:
microk8s join <IP>/<token>
...
From the worker node
$ microk8s join <IP>/<token> --worker
Contacting cluster at 192.168.1.<>

The node has joined the cluster and will appear in the nodes list in a few seconds.

This worker node gets automatically configured with the API server endpoints.
If the API servers are behind a loadbalancer please set the '--refresh-interval' to '0s' in:
    /var/snap/microk8s/current/args/apiserver-proxy
and replace the API server endpoints with the one provided by the loadbalancer in:
    /var/snap/microk8s/current/args/traefik/provider.yaml
In case you forget to make the /etc/hosts change on the master plane, you would get the following error. I'm not sure if you get this only for microk8s.
Contacting 192.168.1...
Connection failed. The hostname (xx) of the joining node does not resolve to the IP "xx". Refusing join (400)
Building the docker image
Kubernetes needs an image to pull from hub, very simply put- all what it cares is the image is available on the hub, and is compatible with the node's platform. Remember we mentioned earlier, while the master node is on x86/amd64 the worker nodes (RPis) are arm64. I'm assuming you would be programming on the x86/amd64 machine, and hence the docker image build is only suitable for that CPU architecture.
$ docker build -t kneerunjun/just-a-sample:1.0
$ docker push kneerunjun/just-a-sample:1.0
While the above image works well on my master node, All the RPis would reject it since the image has been built on a different CPU architecture.Images need to be either compiled separately for ARM64, or one could have a dual platform built images that could run agnostic of the platform underneath.2 separate images (each for AMD, ARM) isn't a good idea, since kubernetes has no provision for fail over images. (or is there a provision?) We need to find a way to have one image agnostic of the platform underneath. Docker default builder isn't any good this case, since we cannot have multi-platform image compilation. docker-buildx to make your own builder and then get to what you want: multi-platform image.
yay buildx
1 extra/docker-buildx 0.11.2-1 (12.6 MiB 55.8 MiB) (Installed)
    Docker CLI plugin for extended build capabilities with BuildKit
==> Packages to install (eg: 1 2 3, 1-3 or ^4)
==>
Get this installed on your master node.Once you have buildx installed, we can then create a new builder with appropriate platform flags.
$ docker buildx create --use --platform linux/arm64,linux/amd64
You can then check the created custom builder using the following command.
$ docker buildx ls
sweet_hugle * docker-container sweet_hugle0 unix:///var/run/docker.sock linux/arm64*,linux/amd64*,linux/amd64/v2,linux/amd64/v3,linux/386
We then use this custom builder to compile the multi platform image. Also will push the image to the hub as requested.Note since we have provided the --platform flag, buildx will pick the sweet_hugle builder
$ docker buildx build . --platform linux/arm64,linux/amd64 -t <hubusername/image:tag> --push
If that runs well, you have an image that works agnostic of the underlying platform, also pushed to Docker Hub
Making a small Go-Lang App:
Since this blog is focused on getting a cluster running, I would not dwell in the details of making a simple Go-gin application. I would urge you to refer to my repository here. You might as well get the entire code forked on your local.
Since I'm continuing my development of this, ahead of writing the blog. The repository is evolving while you perhaps are reading this. I would advise you to fork a tagged commit from the repository. - v1.0.0
Making a new deployment & service
We need a deployment and a service to behind which the app would running. Well, an app runs behind the pod which is behind the deployment. Service is only so that we can check on localhost
2 distinct yaml files
- deploy.yml
- svc.yml
apiVersion: apps/v1
kind: Deployment
metadata:
  name: deply-ginapp
  labels:
    app: ginapp
spec:
  replicas: 5
  selector:
    matchLabels:
      app: ginapp
  template:
    metadata:
      name: pod-ginapp
      labels:
        app: ginapp
    spec:
      terminationGracePeriodSeconds: 1
      containers:
        - name: ctn-ginapp
          image: username/image:tag
          imagePullPolicy: Always
          ports:
            - containerPort: 8080
apiVersion: v1
kind: Service
metadata:
  name: svc-ginapp
spec:
  type: NodePort
  ports:
    - port: 80
      targetPort: 8080
      nodePort: 31111
      protocol: TCP
  selector:
    app: ginapp
Up and running
We are just 2 commands away from getting a scaled, self-healing, containerized, managed app up and running on your cluster.
$ micr0k8s kubectl apply -f deploy.yml
$ micr0k8s kubectl apply -f svc.yml
Lets check:
$ microk8s get pods -o wide

NAME                            READY   STATUS    RESTARTS      AGE   IP             NODE          NOMINATED NODE   READINESS GATES
deply-ginapp-5ddb599979-7b9hb   0/1     Running   1 (16s ago)   24s   10.1.166.97    nirujaro      <none>           <none>
deply-ginapp-5ddb599979-xzlv8   1/1     Running   0             24s   10.1.179.132   rpislave103   <none>           <none>
deply-ginapp-5ddb599979-j9nff   0/1     Running   0             24s   10.1.36.193    rpislave106   <none>           <none>
deply-ginapp-5ddb599979-wbprp   0/1     Running   1 (13s ago)   24s   10.1.107.195   rpislave105   <none>           <none>
deply-ginapp-5ddb599979-26lcf   0/1     Running   1 (13s ago)   24s   10.1.2.4       rpislave104   <none>           <none>
BOOM!

If you have any questions, or are stuck up on the steps anywhere - DM me here on LinkedIn. Not denying the fact that I may be wrong, I wrote this blog after building just one cluster. Chances are I (in a state of excitement) may have quoted something inaccurate. Feel free to point that out too!
Edit August 2024
I just discovered that upwards of microk8s channel > v.1.25/stable there seems to be peculiar error and the node status goes south. Remains NotReady even after a minute. Restarting the node services also does not help.
17:04:47 +0530 KubeletNotReady container runtime network not ready: NetworkReady=false reason:NetworkPluginNotReady message:Network plugin returns error: cni plugin not initialized
Upon researching the internet I finally found the solution. This PR is yet not pulled up in the mainline and hence the bug. It has a simple workaround (I admit its a bit hacky)
Network Plugin Not Ready - GitHub Issue
Kubernetes issue tracking the "NetworkPluginNotReady" error - container runtime network not ready with CNI plugin initialization problems
View GitHub Issue →sudo snap remove microk8s --purge && sudo snap install microk8s --classic --channel=1.27/stable && sudo reboot now
# reboot -------------
microk8s kubectl apply -f https://raw.githubusercontent.com/coreos/flannel/master/Documentation/kube-flannel.yml && sudo snap stop microk8s && sudo snap start microk8s
Go back to your master plane, I assume the node was already added , Check the status now..